Phytometer Addon for 2023/ early 2024
Aim
Understanding how the impact of plant consumers varies across climatic gradients is important to predict the consequences of global change on plant communities. However, existing studies differ substantially in methodology, making generalities across large scales difficult. In addition, variation in plant species composition between sites makes standardization challenging. By planting several phytometer species into the BugNet experimental plots we will be able to assess the individual and interacting effects of insects, fungi and molluscs on plant growth, and how this impact varies along environmental gradients. Such an approach also allows us to obtain quick results within one growing season and therefore to use the BugNet experiments for an early test of variation in enemy impact.
Download protocol as PDF
Methods
Germination
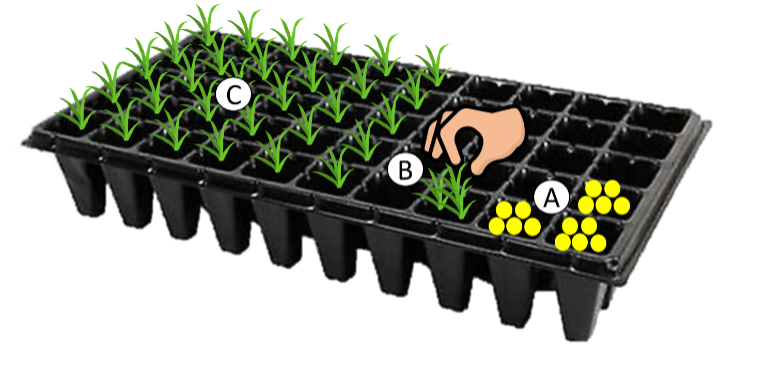
We will use three different phytometer species, which are all widespread, important species for fodder production, and are easy to cultivate: the legume Trifolium pratense, the grass Dactylis glomerata, and the herb Taraxacum officinale. Participating groups will receive seeds of these species sent by the BugNet Team (if possible, collaborators are asked to check the regulations in their country about importing seed). Collaborators are then asked to germinate seedlings in trays on commercial potting soil in a greenhouse, or any other place that is bright enough. A few seeds per species should be directly sown into pots (Fig. 1A). After germination, seedlings will be thinned to just one per pot (Fig. 1B), so that only one individual grows in one pot (Fig. 1C), and will be grown in the greenhouse for another 3-4 weeks until they have developed a few true leaves and are robust enough to be transplanted (if in doubt, you can send us a picture to check). You will need at least 120 similar sized seedlings of each species and a few more to replace dead individuals.
Before planting them out to the field, seedlings should be acclimatized (hardened off) by positioning the plants in a sheltered spot outside during the day for a short time, and gradually extending the amount of time that plants are outside over the course of a week, until they are used to ambient temperatures and light levels.
Planting them into the experimental plots
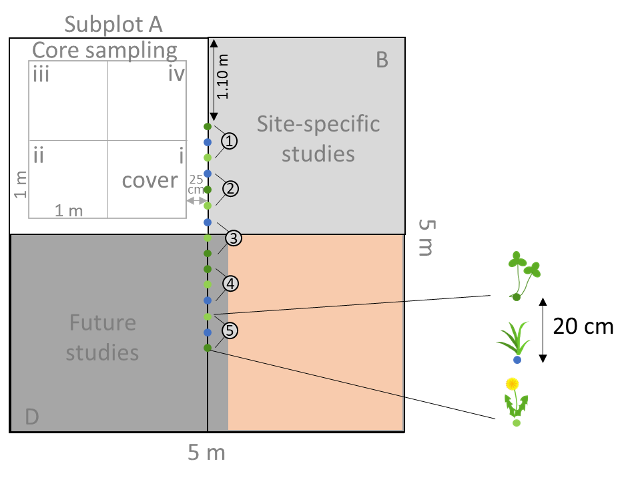
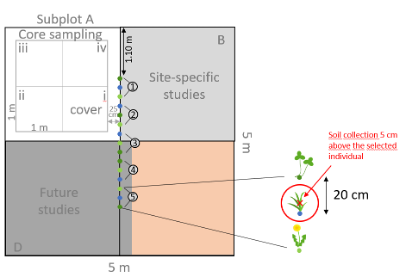
In each of the 24 experimental plots we will plant 5 seedlings of each of the three phytometer species (15 seedlings per plot), giving a total of 360 seedlings. Seedlings will be planted along the middle line of each plot, with a 20 cm distance between seedlings (Fig. 2). Seedlings will be organized in five triplets each consisting of all three species. Within each triplet the position of the different species should be randomized. This randomization procedure should be done in each plot. Planting along the central line allows you to still use the additional subplots for your site-specific studies or treatment addons. In cases where you plan to use a treatment addon that involves the application of nitrogen or other pesticides, leave a 25 cm distance from the middle line (Fig. 2, reddish subplot).
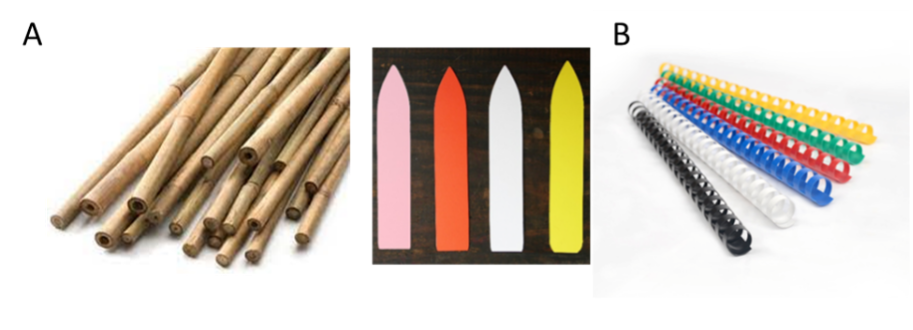
Make a small hole with a stick or spade and gently place the seedling into the ground. A little bit of potting soil around the roots helps the plants to establish and survive. Water the seedlings after planting. Seedlings that die within one week after transplanting should be replaced by spare seedlings. Do also measure the initial height of each phytometer, which we will use as a covariate in the analysis. Phytometers should be marked with sticks (small bamboo canes) and with plastic labels (Fig. 3A). Alternatively, you could place a ring around the base of each plant. These can be made relatively easily by cutting up comb-binding that is used to make booklets (Fig. 3B). Having two markers increases the chance that one will survive. If you plant the phytometers in exactly the same location in each plot they should also not be so difficult to refind.
Measurements
At peak growing season, measure the height (in cm) of each phytometer and harvest them by cutting them at ground level. Then, assess the leaf area (%) that has been damaged on each leaf of each phytometer. You can do this either directly in the field, or you can place plants in a sealed, labelled, plastic zip-lock bag, which you place immediately in a cooling bag, and assess damage back in the lab. Estimate the leaf area that has been removed by chewing herbivores, mining, galling and sucking/rasping herbivores, and the leaf area that is covered by pathogenic disease symptoms of the categories, downy mildews, powdery mildews, rusts and leaf spots. Note that in some cases, damage is present on only the underside of leaves, so remember to check both sides of the leaf for damage.
You can check out our detailed protocol on how to assess damage and also our photo gallery of the most common damage types.
After assessing damage, dry the aboveground biomass of each phytometer in labelled paper bags, and weigh the dry biomass. Please do then combine the five replicates per species and plot (3 combined samples per plot, 72 in total), grind each of them, and send the ground biomass to Anne Kempel in Davos (ideally ground to a powder, if you do not have a grinding machine just send the combined biomass sample per species and plot; find instructions for labelling and sending here). We will then measure nutrient contents in the biomass.
In cases where your site is mown in early summer, you will also need to cut each phytometer at 5 cm above ground at the time of the mowing event. Bag the cut parts into labelled paper bags, dry the biomass to a constant weight and weigh. The final harvest will then be at peak biomass.
There was also the idea to sample roots and soil associated to the rhizosphere. We will develop protocols for the sampling of soil and roots as soon as possible.
Timing
Depending on your climatic zone, different starting points are possible. In general, phytometers should be planted at the start of the growing season and harvested at peak biomass. They receive the pesticide treatment of their respective plot. In temperate Europe, you should very soon start to germinate your seedlings to be able to plant them out during this growing period (2023), e.g., planting out in April and harvesting in late summer, around August. More northern or higher altitude sites would of course start later.
For Mediterranean sites it is probably too late to plant out seedlings this year. For those sites we recommend germinating seedlings in late summer and planting out phytometers in autumn. Harvesting will then be in spring.
Sites in the southern hemisphere will start germinating seedlings a month before their spring (ca. October) and planting out phytometers in spring.
Local regulations
Please check whether the species are invasive in your region and whether planting them out is allowed. Also, it would be great if you can find out whether we need special permits for sending the seeds to your country. As we will remove all phytometers at the end of the growing season, we should fully prevent a potential spread of the species into the wild.
Authors: Anne Kempel & Eric Allan
Optional: More traits, root and soil measurements at harvest
Background
To explore the effects of enemy exclusion on belowground structures and communities, we propose collecting leaf and root traits and soil sample on selected plant individuals at harvest. The aim is 1) to measure how the exclusion of herbivores and pathogens via experimental treatments influences plant leaf and root structures, 2) how much it varies between sites with different herbivore and pathogen pressure, and 3) how it influences soil microbial communities associated with Phytometer plants.
The above-mentioned protocol already suggests measurements of height, damage by herbivores and pathogens, aboveground biomass, and nutrient content. Below is a detailed protocol for measuring additional above and belowground traits that have been shown to occupy most of the functional space of plant species worldwide (Carmona et al. 2021). Selected traits and methods listed below overlap with the TraitDivNet protocol (see also TraitDivNet – Macroecology workgroup (ut.ee)).
Methods
Species and selection of individuals
We will only measure additional traits of two species, Dactylis glomerata and Trifolium pratense. For each of the two species, select ONE individual in each plot. To increase the likelihood of getting enough root material, select the largest individual of each of the two species per plot. This will result in 24 Dactylis glomerata and 24 Trifolium pratense individuals (measurements on in total 48 individuals).
Measurements of leaf traits
In the field: When harvesting the plants to assess aboveground biomass, place three fully developed leaves per selected individual (the 48 individuals mentioned above) in wet paper towel and place them into a ziplock plastic bag (use only one bag per sampled individual). Add a bit of water to the ziplock bag to ensure that the leaves get rehydrated. Use a permanent marker to label the plastic bag with the individual’s ID (Phytometer Nr (1-15) and Plot Nr). After labelling, store the bag in a cool box. If leaves need to be kept for longer than 24 h, store the leaves in a fridge or cool room (2–6 °C) in the dark.
In the laboratory: To assess leaf area, gently dry the leaves with a paper towel. Then scan the leaves of each individual by placing all of the three collected leaves together on a flatbed scanner. Ensure that all leaves sit flat on the scanner (leaves can be cut to pieces to fit them better) with no overlap and the background behind the leaves is clean and a uniform shade (preferably white). For Trifolium pratense, scan the leaf with the petiole included. If your scale is not set for the scanned image, ensure you scan a ruler in order to set the scale for the leaf area when doing the calculations. Calculate the leaf surface area using an image program such as ImageJ or the Easy leaf area app. Record the total leaf area of the sum of all the leaves scanned in the datasheet (units are mm2). After scanning, weight the fresh leaves per individual to obtain fresh leaf weight (units are g). After that, put all the leaves of the same individual into a labelled paper bag.
To assess leaf dry mass, dry each paper bag containing leaves for 48h at 60 °C. After drying, weigh the leaf biomass using a precision balance (the balance should have a precision of at least 0.001 g, units are g). After the leaves are scanned, dried, and weighed, combine the dried biomass of the selected individuals with the four other replicates per plot, grind all of the five replicates if possible, and send the leaf material to Davos for nutrient content analyses (let us know if you cannot grind, then we will do this).
Measurements of root traits
In the field: To assign root traits to individual plants, roots must be traced to the stem of their parent plant. To do this, gently excavate the soil from the rooting point of the selected plants using a knife or a small shovel and try to follow root branches to collect the finest roots while minimizing disturbance. Here is a video of how to do that:
After collection, gently clear the attached soil, spray roots with water, and keep them in a Ziploc plastic bag (use only one bag per sampled individual). Use a permanent marker to label the plastic bag with the Phytometer ID and Plot Number. If roots need to be stored for longer than 24 h, store them in a fridge or cool room (2–6 °C) in the dark, preferably for no longer than two days.
In the laboratory: Carefully wash roots with tap water to remove soil adhering to the roots. Please wash the roots of each individual plant separately to enable examining microbial communities associated with each individual. Several fine roots should be selected from each individual to measure traits. To ensure this, please collect fragments that add up to a total length of ca. 40 cm of fine roots from each individual. It is highly recommended to use a flatbed scanner with a back-light system (transparency unit) to capture the image of the roots. Otherwise, a standard flatbed scanner can be used. Use a resolution of 600 dpi to capture the images. If you do not have access to a scanner, please contact the coordinators or Kadri Koorem for further instructions.
To assess several root traits (root diameter, root tissue density, specific root length), spread the roots of each individual avoiding overlap. Place also a square of 3 cm x 3 cm piece of paper (please make sure it is EXACTLY that size, particularly if you are using the transparency unit) nearby the roots, ensuring no overlap between roots and paper. Save the image as a tiff or png file (for example, “YOURSITE-ID_PHYTOMETER_PLOTNUMBER _DACTYLIS_03.tiff”). We will estimate root diameter, root tissue density, and specific root length in Tartu using the scanned images, so please send all the images using wetransfer to Kadri Koorem. After scanning the roots, put them into a paper bag with the individual ID (“YOURSITE-ID_PHYTOMETER_PLOTNUMBER _DACTYLIS_03”) clearly written; make sure that all the root material that corresponds to the same image is stored in the same bag.
To assess root dry mass, dry each paper bag containing roots for 48h at 40 °C. After drying, carefully extract ALL the roots from the bag, weigh all the root material from the same bag together using a precision balance (the balance should have a precision of at least 0.001 g, unit are g), place the roots again in the same bag, group paper bags into bigger ziploc bags, add some silica gel to the ziploc bag to ensure that the roots will stay dry and send the bags to Tartu (see guidelines below).
Microbial activity
In the field: Collect soil samples for microbial analyses moving 5 cm towards the first triplet of the plot (upwards) from each sampled Dactylis and Trifolium individual. Use a soil corer (2.5 cm diameter) and collect a sample up to 5 cm depth. Place collected soil into a small paper bag, place the paper bag into a small ziploc bag and label the ziploc with a permanent marker (e.g., YOURSITE-ID_PHYTOMETER_PLOTNUMBER _DACTYLIS_03). You will have 48 soil bags in total.
In the lab: Add three teaspoons of silica-gel to the Ziploc bags to dry the sample rapidly and close the ziploc airtight. Check the samples after 24h and replace or add the silica-gel if it has changed color.
Sending roots and soil
Send root and soil samples to Tartu for further analyses:
Kadri Koorem
Institute of Ecology and Earth Sciences,
University of Tartu
Juhan Liivi 2
50409 Tartu
Estonia
Contact: +37256468541, Mail
If you are outside of the European Union, please contact Kadri Koorem before sending the packages to receive specific information and documents related to the shipment. Within the EU no special documentation is needed. Shipping should be done using a courier or post service with a tracking number. Express shipping is not required, but we need to be able to track the parcel during the shipping. Once the parcel is shipped, write us an email to let us know about the shipment and include the tracking information.
Sending leaves
Send leaf material to Davos for further analyses. Detailed instructions for preparing and sending samples to Davos can be found here.
Author: Kadri Koorem